“Nikon D5100 Review” plus 1 more: Digital Photography School | |

Posted: 16 Jun 2011 01:22 PM PDT  While nipping at the heels of its top level sibling, the D7000, this baby has a couple of advantages: a smaller size and arguably a less challenging user interface. It is in fact an excellent prosumer or enthusiast camera.  In the hand it's a practical camera and, at a pinch, could be used single-handed, with the shutter button, mode dial and command wheel within mills of the forefinger and thumb. But you wouldn't, would you …! The review camera was supplied with the f3.5/18-55mm kit lens.  Nikon D5100 FeaturesThe CMOS sensor has 16.2 megapixels and uses the Nikon DX format, which gives a 1.5x factor when compared to a 35 SLR.The 7.5cm LCD screen is articulated in a horizontal sweep, can swing through an arc up to 90 degrees clockwise and up to 180 degrees counter-clockwise: I found this to be a big help when the D5100 was tripod-mounted. Its resolution is a high 921,000 pixels. Optical viewing is via a pentamirror. Maximum image size is 4928×3264 pixels, from which you can make a 42×28cm print. Video is at the top level of Full HD 1920×1080 at 24/25/30fps which can be captured with auto exposure and full auto focus but requiring you to press the shutter button half way to trigger the focus action. As the lens handles the focusing chore I guess the performance is directly related the quality of the optic; the kit lens worked satisfactorily in my tests. The onboard mic of course captures all the bumps and squeaks as AF does its tricks. And they are considerable. Plug in an external mike! It is also advisable to use memory cards rated as class 6 or higher to avoid hiccups when recording.  If you try to shoot stills while recording a movie the latter action stops but you can later retrieve individual video frames as JPEGs. ISO ratings run from ISO 100 to 6400 but you can lift this to ISO 25,600 by lifting the sensor gain. If you want to squeeze some extra lumens out of a tricky shot there is an HDR function that uses two exposures to maximise the capture of shadow and highlight details. This is selectable from the camera menu and presents some interesting options to the educated user: you can select an exposure differential between the images of up to three f stops. The function allows some smoothing of the paired images; this I presume is to better match the images if they are shot handheld … but serious HDR practitioners would obviously use a tripod! And HDR only works with JPEG images.  The special effects mode is a blast! Applicable to stills and movies, there is night vision, color sketch, mini effect, silhouette and more. How about night vision, captured at an ISO equivalent of up to ISO 102,400 — complete with tonnes of wild pixels! The great thing is that each has an enormous range of adjustment. Let's wait for an answer from Olympus with its Art Filters … this one sure beats the pants off the latter! ISO TestsIt was only when the ISO setting reached 6400 that noise became noticeable, but not objectionably so. 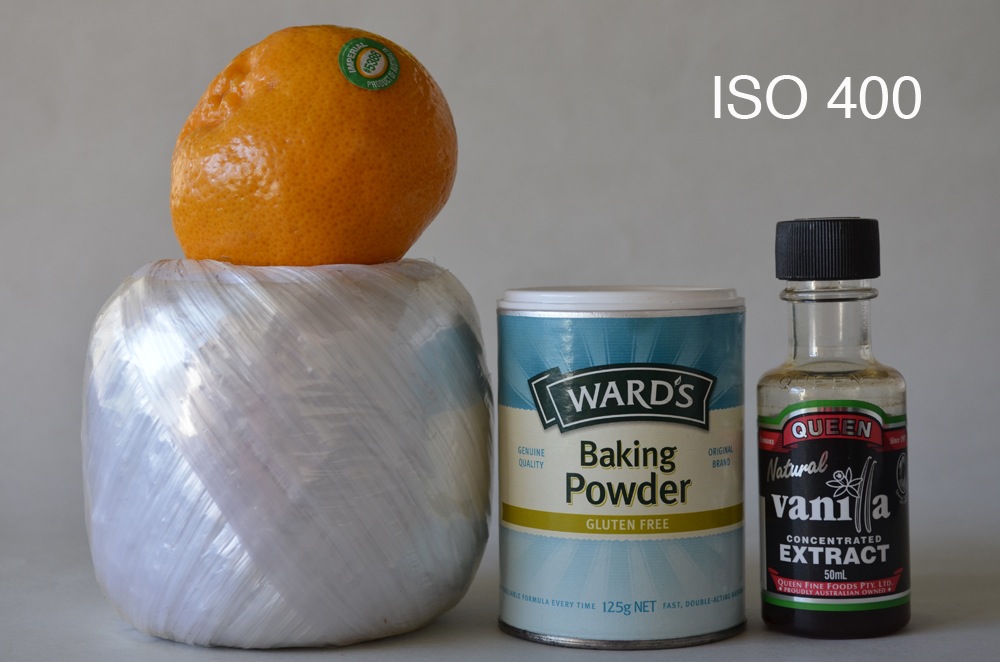   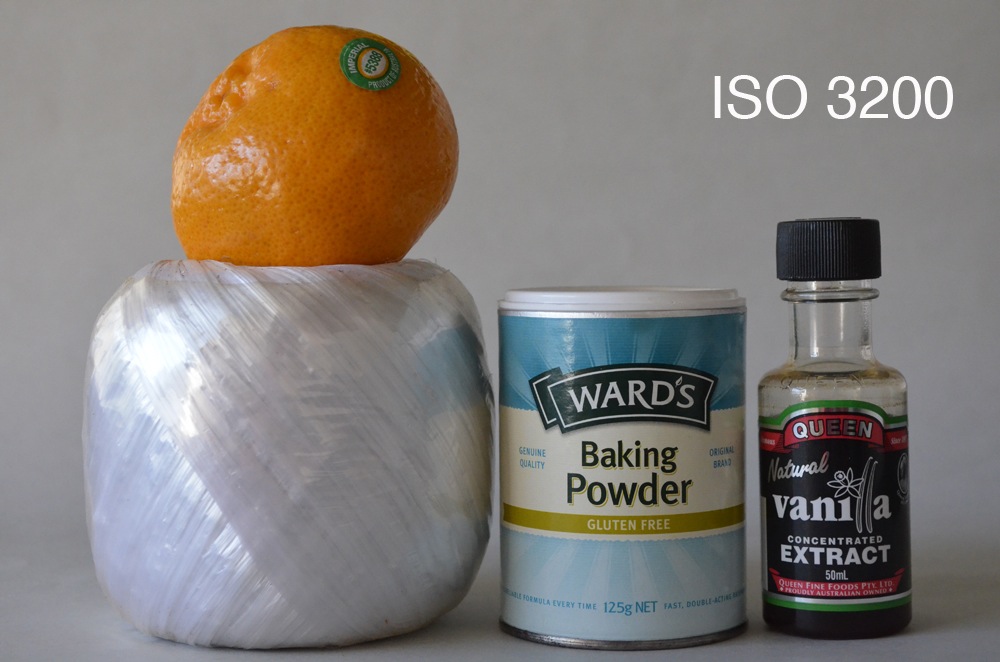   CommentThis one is for the educated user; it would frustrate the beginner. Having said that, the D5100 is an aspirational camera: it will give legs to the ambitious photographer and give wings to ambitions to capture advanced imagery. Quality: excellent, full bodied colour, razor sharpness. Top performer.  Why you would buy it: excellent articulated LCD screen; you want Full HD with auto focus shooting; Why you wouldn't: there is no dedicated ISO button. A couple of points: I was not happy with the Live View button and the movie record buttons placed on the top surface near the mode dial. A very cluttered area with a total of nine controls in the vicinity. Nikon D5100 SpecificationsImage Sensor: 16.2 million effective pixels.Metering: Matrix, centre-weighted metering and spot. Effective Sensor Size: 23.6×15.6mm CMOS. Format: Nikon DX. A/D processing: 14-bit. Lens Mount: Nikon F (with AF contacts). 35 SLR Lens Factor: 1:5x. Exposure Modes: Auto, Program AE, shutter and aperture priority, manual. Shutter Speed: Bulb, 30 to 1/4000 second, Bulb. Flash X-sync: up to 1/200 sec. Continuous Speed; 4fps. Memory: SD/SDHC/SDXC cards. Image Sizes (pixels): 4928×3264 to 2464×1632. Movies: 1920×1080 to 640×480 at 24/25/30fps. Viewfinders: Eye level pentamirror, 7.5cm LCD (921,000 pixels). File Formats: NEF (RAW), NEF (RAW)+JPEG, JPEG, MPEG4. Colour Space: Adobe RGB, sRGB. ISO Sensitivity: Auto, 100 to 25,600. Interface: USB 2.0, AV, HDMI mini, DC input, external mic, remote. Power: Rechargeable lithium ion battery, AC adaptor. Dimensions: 128×97x79 WHDmm. Weight: Approx. 690 g (with memory card and battery). Price: Get a price on the Nikon D5100 in the following configerations: Post from: Digital Photography School's Photography Tips. Check out our resources on Portrait Photography Tips, Travel Photography Tips and Understanding Digital Cameras.  Nikon D5100 Review |
Posted: 16 Jun 2011 07:05 AM PDT  When you Google about photographing indoors, one of the most unmistakable feelings you come away with is that you can’t do it with your existing equipment. Kit lenses aren’t ‘fast’, they don’t shoot in a wide open f/1.4, you don’t have a big external flash. All of these things can leave you feeling helpless to take great photos indoors. The catch with kids is that they move fast so a slow shutter speed isn’t always an option. Or maybe it is? Here are my 5 top tips for photographing children indoors using your existing equipment: When you Google about photographing indoors, one of the most unmistakable feelings you come away with is that you can’t do it with your existing equipment. Kit lenses aren’t ‘fast’, they don’t shoot in a wide open f/1.4, you don’t have a big external flash. All of these things can leave you feeling helpless to take great photos indoors. The catch with kids is that they move fast so a slow shutter speed isn’t always an option. Or maybe it is? Here are my 5 top tips for photographing children indoors using your existing equipment:
How to photograph children {and other stuff} indoors |
No comments:
Post a Comment