“3 Minutes with Photographer William Neill” plus 1 more: Digital Photography School | |

Posted: 15 Jun 2011 12:46 PM PDT William Neill has long been an iconic nature photographer with work spanning classical landscapes to contemporary nature abstracts. A long time contributor to Outdoor Photographer magazine and an active blogger on William Neill’s Light on the Landscape Photoblog his photographic roots go back to working with Ansel Adams in Yosemite National Park. Deeply knowledgeable and inspirational he is today’s guest on “3 Minutes with…” Describe your photography in 100 words or less. I am a landscape photographer concerned with conveying the deep, spiritual beauty I see and feel in Nature. I have been a resident of the Yosemite National Park area since 1977, have been widely published in books, magazines, calendars, posters. I worked as a staff photographer at The Ansel Adams Gallery for five years. My limited-edition prints have been collected and exhibited in museums and galleries nationally, including the Museum of Fine Art Boston, Santa Barbara Museum of Art, The Vernon Collection, and The Polaroid Collection. I received a BA degree in Environmental Conservation at the University of Colorado. In 1995, the Sierra Club honored me with their Ansel Adams Award for conservation photography.  Aspen and approaching storm, Conway Summit, California 2010 Canon EOS-1Ds Mark III, EF70-200mm f/2.8L USM, 1/45 sec at f / 16, ISO 400 What gear/software do you use? For twenty years, I used a 4×5 view camera and transparency sheet film. Currently, I use a Canon 1DS Mark III with an assortment of lenses. My favorites are the 70-200mm zoom and 90mm Tilt Shift lenses. I also used Canon's 24mm TS, the 16-35mm and 24-105mm zooms and the 50mm Macro. I carry LowePro camera bags and use a Gitzo Carbon 6X tripod. Using filters has never been a big part of my approach to nature photography, but I do use Singh Ray's Vari-ND filter often for long exposures and the creative blurs in my Impressions of Light series. In terms of software, I primarily use Adobe Photoshop and Lightroom. I occasionally use HDR processing and Nik software. I edit and mange my files in Lightroom, make global adjustments there before making any local adjustments and masking in PS.  Almond Trees in Bloom, Kern County, California, 2011 Canon EOS-1Ds Mark III, EF70-200mm f/2.8L USM, 1/4 sec at f / 4.5, ISO 100, FILTER: Singh Ray Vari-ND What's one quick tip that you'd give people interested in Nature photography. Photograph those subjects or locations about which you feel most passionate. Trust your instincts to find a creative vision. The world is full of repetitive imagery, and it takes hard work and experimentation to rise above the ordinary.  Sunrise surf, Carmel, California 2010 Canon EOS-1Ds Mark III, EF70-200mm f/2.8L USM, 10.0 sec at f / 32, ISO 100, FILTER: Singh Ray Vari-ND What Photography Sites or Photoblogs do you Recommend? View more of William Neill’s work at on his web site and in his latest iPad app William Neill’s Yosemite Volume One. Post from: Digital Photography School's Photography Tips. Check out our resources on Portrait Photography Tips, Travel Photography Tips and Understanding Digital Cameras.  3 Minutes with Photographer William Neill |
Posted: 15 Jun 2011 07:07 AM PDT 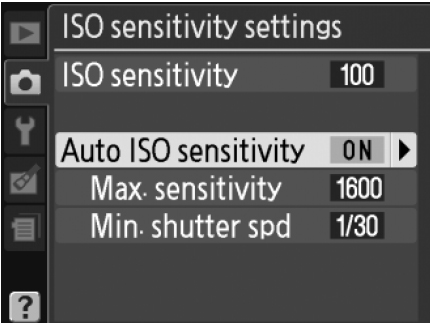 One of digital photography’s largest advantages over film is the ability to change ISO settings on the fly. For those new to the game and not familiar with the idea, a roll of film was set to the same ISO and once loaded, typically was not removed until all 24 or 36 shots were done (or 10 or 20 shots for most medium format backs). This meant if 100 speed film was in the camera and you went inside to shoot in low light, it was hard to get decent results. One of digital photography’s largest advantages over film is the ability to change ISO settings on the fly. For those new to the game and not familiar with the idea, a roll of film was set to the same ISO and once loaded, typically was not removed until all 24 or 36 shots were done (or 10 or 20 shots for most medium format backs). This meant if 100 speed film was in the camera and you went inside to shoot in low light, it was hard to get decent results.With the advent of digital sensors, the ISO setting, which represents the sensor’s sensitivity to light, became adjustable image by image. It was a boon for those of us who might hit a lot of different lighting scenes in the course of a day. Bright light, low light…it didn’t matter. Just take a second to adjust the ISO before shooting and presto! No worries about blur! Take that one step further and it seemed like utopia had been discovered when Auto ISO was unveiled. It was something of a holy grail; now here is the chance to forget about ISO settings and concentrate on the scene at hand. But hold on before you get too excited. Auto ISO has its limits. The main detracting factor for Auto ISO is the camera’s propensity to use it without consideration for the consequences. You see, your camera doesn’t care about noise in images, but your image viewers probably do. And if you care about your art, chances are you don’t like noise in your shots either. 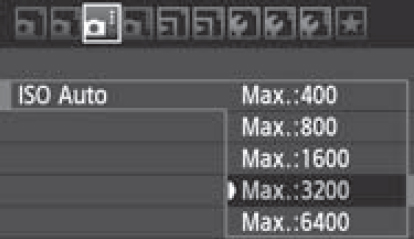 And for a while this was the way it was. A camera might have an ability to obtain an ISO 3200 setting but do you really want to use it often? For those of us who answered, "No" we were stuck with setting our ISO and making it one more consideration before shooting. Until the manufacturers picked up on the feedback from the field. And for a while this was the way it was. A camera might have an ability to obtain an ISO 3200 setting but do you really want to use it often? For those of us who answered, "No" we were stuck with setting our ISO and making it one more consideration before shooting. Until the manufacturers picked up on the feedback from the field.Noise from camera sensors typically starts making itself known around ISO 400 or ISO 800. It’s different for different cameras depending on sensor size and manufacture. For those unfamiliar, noise is not grain, as in the days of film. Grain can be appealing, but noise is almost always considered ugly. It looks like the image below and typically shows up in darker areas. The first image is ISO 100 while the second is at an extreme of ISO 12,800. Click on each image for a larger zoom.  ISO 100  ISO 12,800 Curious about what to set for your maximum Auto ISO? This is a subjective matter and will depend on your likes and dislikes. Take some sample images at different ISO settings in different lighting situations. My typical suggestion is nothing higher than ISO 400 for Auto ISO. If you want a higher ISO because the situation calls for it, then make the conscience choice to raise it. Post from: Digital Photography School's Photography Tips. Check out our resources on Portrait Photography Tips, Travel Photography Tips and Understanding Digital Cameras. Limit Your Auto ISO |
No comments:
Post a Comment